

Key level trading is arguably the most foundational strategy applied to gold, and it works particularly well on XAU/USD because gold is heavily traded by both institutional and retail participants who tend to concentrate orders around similar reference points. Where some strategies require interpreting lagging indicators or subjective chart patterns, key level trading gives traders clear, identifiable price zones to plan around — areas where the balance between buyers and sellers has repeatedly shifted in the past and is likely to matter again.
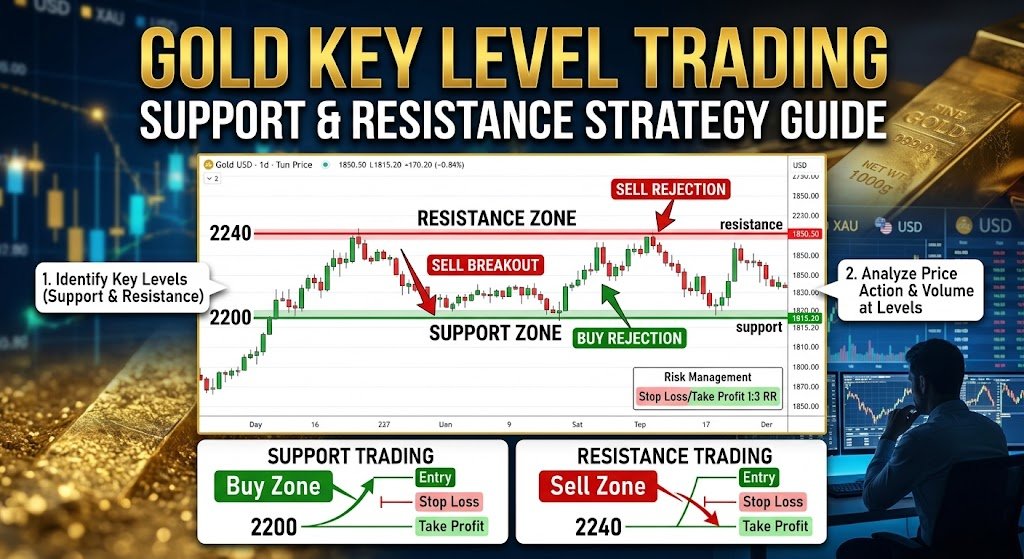
This guide covers what makes a gold price level genuinely significant, how institutional order flow concentrates around these levels, how to separate real breakouts from false ones, the role macro catalysts play in triggering breaks, and how to structure entries, stops, and targets around key levels with discipline.
What Makes a Gold Price Level Significant
Significant levels on gold typically fall into a few categories: prior major swing highs and lows that mark clear turning points in price history; psychologically significant round numbers such as $2,000, $2,500, or $3,000 per ounce, which tend to attract disproportionate attention from both retail and institutional participants; and levels that have been tested multiple times, which accumulate significance with each successful defense or rejection.
Round-number levels are particularly notable on gold compared to other asset classes, since the psychological weight of round thousand-dollar marks tends to generate real order flow concentration, not just chart-watching behavior. A level’s significance is rarely about the number itself — it’s about how much historical price action, and how many participants’ decisions, are anchored to that specific area.
Not every prior swing point deserves equal weight. A swing high or low that formed on a single, low-volume spike carries less significance than one that price consolidated around for multiple sessions, or one that has already been tested and defended more than once. As a general rule, the more times a level has been touched and held, the more attention it tends to attract on subsequent approaches — though this cuts both ways, since a level that has been tested repeatedly is also more likely to eventually give way.
How Institutional Order Flow Concentrates at These Levels
This order flow concentration is central to understanding how institutional participants interact with key levels. Large market participants often place resting orders just beyond obvious support and resistance levels, anticipating that retail stop-losses will cluster just inside those same levels. This creates identifiable liquidity zones — pools of orders that price is drawn toward before making a more decisive move.
A brief spike beyond a key level that quickly reverses, commonly referred to as a stop hunt or liquidity sweep, is a frequent occurrence on gold precisely because of how predictably retail participants place their stops around obvious levels. Understanding this dynamic changes how a trader interprets a spike through a key level — rather than assuming every break is genuine, it becomes second nature to ask whether the move has the characteristics of a real breakout or a liquidity-driven sweep designed to trigger stops before reversing.
Breakout Trading vs. Rejection Trading
Entry logic at key levels generally falls into two categories: breakout trading and rejection trading. Breakout traders wait for price to close decisively beyond a level, typically on a strong-bodied candle with follow-through in subsequent price action, before entering in the direction of the break. Rejection traders do the opposite, entering counter-trend when price approaches a well-established level and shows clear signs of failure to break through, such as a long wick or a strong reversal candle at the level.
Each approach suits a different market condition. Breakout trading tends to perform better when a level has already been tested multiple times and is showing signs of structural weakness, or when a scheduled macro catalyst is approaching that could provide the momentum needed for a genuine break. Rejection trading tends to perform better at levels being tested for the first time, or in range-bound conditions where gold has repeatedly failed to sustain a break beyond a well-defined ceiling or floor. Traders who rely exclusively on one approach regardless of context often find themselves fighting the prevailing market condition rather than adapting to it.
Distinguishing a Genuine Breakout from a False Breakout
Distinguishing a genuine breakout from a false breakout is one of the more difficult skills to develop in this strategy. Traders typically look for confirmation through a full candle close beyond the level rather than an intra-candle spike, combined with sustained follow-through over subsequent candles rather than an immediate reversal, and ideally supported by rising volume or momentum on the break.
A useful practical filter is to wait for the candle that broke the level to close, and then wait for at least one additional candle to hold above (or below) the broken level before treating the breakout as valid. This costs a small amount of the initial move but meaningfully reduces the frequency of being caught in a false break that reverses within the same session. Momentum indicators can supplement this read, but price behavior itself — specifically, whether the market is willing to hold new ground rather than immediately give it back — remains the most direct evidence of a genuine break.
A Structural Example
Consider a simplified, structural walk-through of how this plays out on gold. Price approaches a well-established round-number level that has acted as resistance on two prior occasions, each time producing a sharp rejection with long upper wicks. On a third approach, price spikes marginally above the level intraday but closes back below it by the end of the session — a textbook liquidity sweep rather than a genuine breakout, consistent with stop orders above the level being triggered before sellers regained control.
Some sessions later, price approaches the same level again, this time alongside a scheduled high-impact economic release. Following the release, price closes decisively above the level on a strong-bodied candle, and the next session opens above the prior resistance and holds throughout the day rather than reversing. This combination — a macro catalyst, a full candle close beyond the level, and sustained follow-through — is treated as confirmation of a genuine breakout, with the former resistance level now expected to act as support on any retest.
The Role of Macro Catalysts in Breaking Key Levels
Macro catalysts play an outsized role in determining whether a key level actually breaks or holds. Scheduled events such as Non-Farm Payrolls (NFP), Consumer Price Index (CPI) releases, and Federal Open Market Committee (FOMC) decisions are the most common triggers for decisive breaks of well-established gold levels, since these releases can shift the market’s real yield and dollar expectations abruptly.
Levels that have held for weeks or months in the absence of a major catalyst often break cleanly once one of these releases surprises market expectations. This is a useful planning tool in itself: a key level approaching just ahead of a high-impact release deserves a different risk approach than the same level being tested on a quiet session with no scheduled catalyst, since the probability of a decisive, catalyst-driven break is meaningfully higher around these events.
Stop Placement and Target Setting
Stop placement in key level trading is typically set just beyond the level itself, accounting for the possibility of a brief liquidity sweep before the genuine move develops, rather than directly at the level where a minor spike would prematurely close the trade. This buffer should scale with gold’s prevailing volatility — a fixed dollar-amount buffer that works during a quiet period may be far too tight during a high-volatility news week.
Targets are generally set at the next significant level in the direction of the trade, whether that is a prior swing point or the next major round number, giving the trade a defined and logical risk-to-reward structure rather than an arbitrary fixed target. Where multiple levels exist between entry and a distant target, partial profit-taking at each intermediate level is a common way to manage risk while still allowing part of the position to capture a larger structural move.
Common Mistakes Traders Make
Several recurring errors undermine an otherwise sound key level strategy on gold. The first is placing stops directly at the level itself rather than beyond it, which leads to being stopped out repeatedly by ordinary liquidity sweeps rather than genuine reversals.
A second common mistake is treating every touch of a key level as an equally valid trade setup, without considering whether the level is being tested for the first time, has already been swept once, or is approaching alongside a major macro catalyst. Context around each specific test of a level matters as much as the level itself.
A third mistake is entering a breakout trade the instant price spikes through a level intraday, without waiting for a candle close or follow-through confirmation. This is one of the most common ways traders get caught on the wrong side of a liquidity sweep that later reverses.
Finally, many traders fail to distinguish between a minor, recently formed level and a major, well-established one that has held for an extended period. Not all key levels carry equal weight, and applying the same conviction and position sizing to both can lead to inconsistent risk-adjusted results.
Frequently Asked Questions
What are the most important price levels to watch on gold?
Major psychological round numbers such as $2,000, $2,500, and $3,000 per ounce, along with prior significant swing highs and lows that have been tested multiple times, tend to be the most closely watched levels among gold traders.
How do you know if a gold breakout is real?
A genuine breakout is typically confirmed by a full candle close beyond the level, followed by sustained price action holding beyond that level over subsequent candles, rather than an immediate reversal. Breaks that coincide with a major scheduled catalyst, such as an FOMC decision or CPI release, are generally considered more reliable than breaks occurring without a clear fundamental trigger.
Why does gold often spike through a level and then reverse?
This pattern, commonly called a stop hunt or liquidity sweep, occurs because retail stop-losses tend to cluster just beyond obvious support and resistance levels. Larger participants are often aware of this concentration, and brief spikes beyond a level can reflect that liquidity being absorbed before price reverses.
Should stops be placed exactly at a key level?
Generally not. Placing a stop directly at a level increases the likelihood of being stopped out by a brief liquidity sweep rather than a genuine reversal. A small buffer beyond the level, scaled to current volatility, is typically more resilient.
Conclusion
Key level trading gives gold traders a clear, repeatable framework built around genuine order flow behavior rather than lagging indicators. Understanding what makes a level significant, recognizing the difference between breakout and rejection setups, filtering out false breaks through confirmation, and accounting for the outsized role of scheduled macro catalysts all combine to make this one of the more reliable strategies available on XAU/USD. Avoiding the common pitfalls outlined above — particularly stops placed too tight and breakout entries taken without confirmation — meaningfully improves consistency. As with the other strategies covered in this series, key level trading tends to perform best not in isolation, but when combined with broader trend structure and macro context to confirm the overall direction of a trade.
This article is for informational and educational purposes only and does not constitute financial advice. Gold trading involves significant risk of loss.